
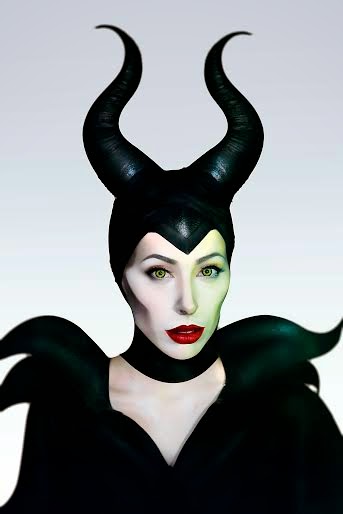
Maleficent high cheek-bones and her malevolent eyes depict
about her atrocious &wicked personality. Her plump & pouty lips reflect
her inner malice. To transform yourself into Maleficent you need maleficent
cosplay circle lenses along with maleficent costume and makeup. Maleficent
makeup transformation pays great focus on “Contouring”. You should have strong
grip on makeup brushes. Contouring & Correction together paves way for
perfect “Maleficent Makeup”.
Maleficent Makeup Steps:
Face:
- Prepare your face by applying thin layer of white aqua color or any light colored foundation to lighten your skin tone. This will also help making your face monotone.
- Now apply concealer to cover imperfections if any.
- Using a dark color of foundation/powder create dimensions at your face. Shape your bones sharp using a flat brush.
- Maleficent has exaggerated bones, so pay keen attention when shaping your face. Create high cheek bones by drawing a thin line just below the cheek lines and shade the temples of the face at least 4 times darker than your skin tone.
- Create thin and sharp nose bridge. Follow your own skeletal pattern whilst contouring.
- Create fuller lips by drawing fake lip lines, shape your eye brows to keep them malevolently shrill
- Blend everything up using loose powders.
- Apply peach/pink cream ye shadow at eyelids & fix it using a matching powder. Highlight eyes inner corner using some yellow eyeshadow and make a crease with brown eye shadow.
- Apply eyeliner using a dabbing motion at just the upper lash line to create illusion of thicker lashes.
- Apply mascara; wear false lashes and with a liquid eyeliner line your eyes. Don’t forget to extend tear duct a bit from the inner corners.
You are done! Purchase your Maleficent Cosplay Lenses here&
watch full video tutorial for maleficent
character transformation by Sumi Moon.
No comments:
Post a Comment